Build a video playing screen saver with Quartz Composer
If you're wondering what Quartz Composer is it turns out it is a node based visual programming language introduced way back when Tiger came out. If node based visual programming is the kind of thing that makes you excited when you wake up in the morning you're probably familiar with the seemingly infinite amount of usefulness that can be had with Quartz Composer. If you just want to use Quartz Composer to have a little fun you're at the right place.
I'm going to use Quartz Composer to play a video as the screen saver. Not a full screen video, that might get me fired if the boss looks over my shoulder, but a video that bounces around the screen that looks precisely like a screensaver to the casual observer. Toss on a pair of earphones, throw some papers on the desk and while I'm watching the any particular video of interest it will look to all the world like I'm working.
Before getting started with the Quartz Composer TV Show screen saver, it is a good idea to pick a video test file and put it in an easily memorable place (I'm going to use a video of my kid, he loves to see himself on the internet). The file should be something OS X can easily play: a plain old .mov file or an .mp4 should be fine. For the purposes of this hack I've placed a file called simpsons.mov on the desktop but any place you want to keep it is fine.
With the test file in place, it is time to start using Quartz Composer. Quartz Composer is located in the Developer folder which is located at the root of the hard drive by default so if you've installed Apple's Developer Tools that's where you'll find it. If you haven't installed Developer tools, get cracking! You can sign up to be developer at for the low price of free and download the Apple's Developer Tools or nstall them from the disks that shipped with your Mac. Still too much work? You'll find a link to the completed project at the end of this post.
Once Quartz Composer is up and running, the next step is choosing a starting point. In this case it is wise to eschew any of the premade templates offered by Quartz and opt for "Blank Composition". You're not being a glutton for punishment by rejecting the templates; this particular project is actually easier if you avoid Apple's suggested starting points.
This is an opportune moment to become familiar with the Quartz Composer basics. The window layout seems like a decent place to start. Once you have chosen a starting point, you'll be left with three windows and, unless you've used Quartz Composer before, very little idea of what is going on.
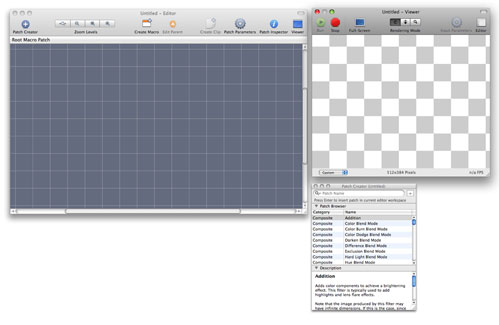
The three windowed scheme of Quartz composer
A quick look at what each window does will be helpful:
Editor window
Think of this window as a workspace. This where you put patches (input sources and objects that act upon inputs) and hook patches together. As you work the results of your efforts will be displayed in...
Viewer window
This provides a preview of the final product will look like. Be forewarned that the Viewer window and the final product will often differ markedly
Patch Creator window
This is where all the patches live. You add patches from this window to the Editor Window.
If you're still a little confused, don't worry. Quartz Composer is surprisingly easy to use but it is hard to get a handle on what is going until you actually start trying to build something. The previous sentence offers both a hurdle to completion and the solution to overcoming the barrier. Time to take the plunge and start building something. <br /> Find your video file and drag it onto the Editor Window. Quartz Composer will automatically add the appropriate path to the file. You can see the path by clicking the Patch Parameters button as revealed as shown below. Since you were able to get salient information by clicking Patch Parameters button, you should congratulate yourself, you've just made your first Source patch (in Quartz Composer speak). The patch in this Hack is called "simpsons"
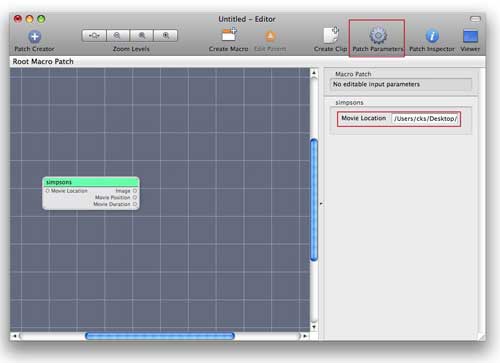
Your video clip has become an input patch!
Your video clip is now in Quartz Composer but you can't see it in the Viewer window because Quartz Composer needs to be told how to render the input. To achieve this, a Render patch needs to be added. Head to the Patch Creator window and start typing "Billboard" into the search box. Like Spotlight, Quartz Composer searches as you type so once you see Renderer and Billboard show up, you can drag Billboard to the Editor window, like in the following pic:

Adding the Billboard renderer
The Billboard renderer works just as its name suggests. It creates a flat image of the input that can be moved in the x and y direction. But that's racing ahead. For now (believe it or not) you're one step away from a rudimentary screen saver that plays your video file. All that is left to do is connect the input to the renderer. This is one of the places Quartz Composer really shines, instead of some arcane text based link to connect the input to the renderer, you drag a line connecting the input to the renderer. In this case, click the image dot from the patch called simpsons to the image dot on Billboard patch. Once the connection is made, the video clip will start playing in the viewer window and, if you wish, you can save the file. Congratulate yourself, you've made a file that plays a video clip as a screen saver.
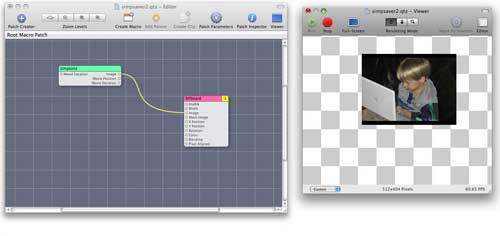
A rudimentary video playing screen saver.
Well, the screen saver has been made but it is honestly kind of lame. It just sits there in the middle of screen not doing much. You might as well just open a YouTube page and let videos play. Why not crank up the interest level and add some movement to mimic the way screen savers have traditionally worked?
Since this screen saver uses the Billboard patch, it can be moved in the x and y direction. You will need another patch (or patches), however, to generate the coordinates you want the image to move to. You have several choices at this point; Quartz Composer has a bevy of options to generate these values. To keep things on the simple side, try the "LFO" patch (type LFO into the search box in the Patch Creator window). This patch will generate values for x and y, plus you can adjust the numbers to suit our purposes. Drag the patch to the Editor Window twice (two separate copies) and connect one "Result" to "X Position" and the other result to "Y Position" if that's not clear consult the pic:
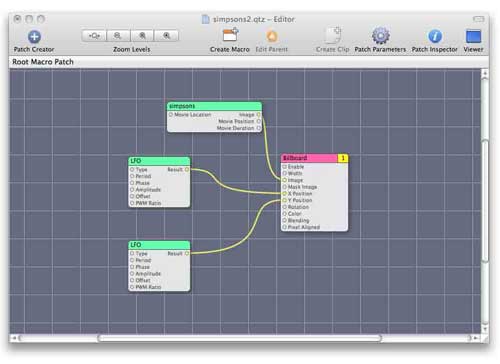
A moving image! Or rather a moving image that moves.
There isn't good way to convey what happens after you make those connections in a screenshot, but chances are your reaction will be "Well, that is simply horrible." And it is. The image is difficult to look because it is moving too fast, and oscillates repetitively to the corner of the screen and out of view and then back to the middle. This needs to be fixed.
To adjust the motion of the image, the patch parameters will need to be tweaked. Select the LFO patch controlling the X Position and click the Patch Parameters button as shown in the lists below:
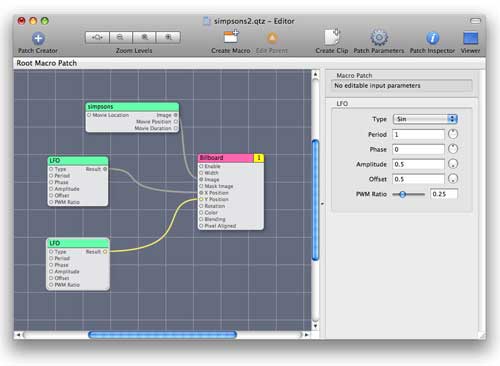
The defaults do not result in a pleasant screen saver
The question is what should the defaults be changed to? It would better if the image didn't slide off the screen, if the movement was slower and if the image traveled in a gentle ellipse around the screen. To slow the image down the "Period" will have to be changed to a larger value: trial and error reveals that a decent value for the period is 10. To keep the image on the screen in the X axis change "Offset" and "Amplitude" to .25. Finish tweaking the "X Position" LFO by changing Sin to Cos. The list below shows the settings in a readable format:
X position LFO settings:
Type Cos
Period 10
Phase 0
Amplitude .5
Offset 0
PWM Ratio .25
With the movement in the X plane taken care of it is time to adjust the movement in the Y plane. Those who are playing along at this point are being nauseated by the up and down jumping of the video clip so it is better to head straight to the next table.
Y position LFO settings
Type Sin
Period 7
Phase 0
Amplitude .3
Offset 0
PWM Ratio .25
The lists don't tell you much about what is going on, so a quick explanation is in order. The Type indicates the function used to generate the position. In this hack I wanted the image to travel in an ellipse, so setting one Type to Cos (cosine) and one to Sin (sine) results in the image traveling in a circular pattern. Period sets the speed of the motion, the period being the amount of time it takes for one complete cycle. A period of 10 takes, well, 10 times as long as a period set to 1. Matching periods give a circularish motion, unmatched periods (in this case) give a feeling of random movement. Amplitude controls the amount of deviation from the center co ordinate (0,0 for Quartz Composer). An amplitude of 1 sends the image off the edge of the display since the coordinate system of Quartz composer is bound by 1. Put differently, the edges of the Quartz Composer display are 1 and -1 in both the X and Y direction. Having slightly different values for Amplitude gives the image an elliptical path. Since most monitors are wider than they are tall, giving X the larger value ensures the ellipse will have a larger movement in the X plane than the Y plane. PWM Ratio doesn't really seem to have an effect in this instance so you can safely ignore that value. Finally, Offset is the amount the image will be moved from the 0,0 coordinate. Setting both values to 0 ensures that the image will rotate about the middle of the screen.
That was one boring explanation. For real fun start playing with the settings yourself.
At this point, the hack is seemingly done. The image is rotating slowly about the origin, is easy to look at and you could fire up the screen saver and watch TV without anyone thinking you were spending time on YouTube. That is the obvious conclusion, but if you actually stop here and try the thing as a screen saver, something horrible happens:
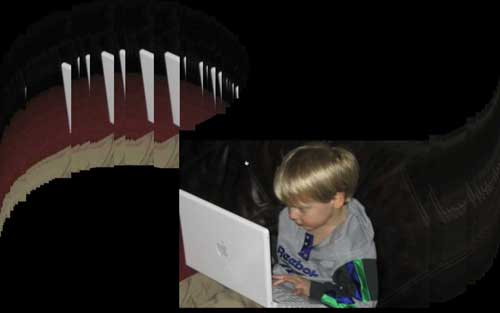
The goggles, they do nothing!
With most hacks it is a great idea to work on copies and only change whatever you're going to be changing at the very end. With this hack you can work on your screen saver while it is sitting in its final destination. This can be a helpful step because there can be discrepancies between what the Quartz Composer Viewer window shows and what the screen saver actually does. If you want to test your screen as you're building it, save the file to the Screen Savers folder found in your Home folder's Library. Now you can test any tweaks you make to the project directly with the Screen Saver pane in System Preferences.
What you'll see is that no images are erased, they are just written over. In and of itself, that can be pretty cool, but in this case it looks like someone regurgitated pixels all over the screen. Don't worry, it is an easy fix. To get rid of the trailing image, all you need to do is add one patch, and as a bonus you don't have to connect any nodes. Search for the "Clear" patch and drag it in to the Editor Window. Your immediate thought will be that you killed the screen saver because the entire Viewer goes black. but the animation is still going--you just can't see it. Change the layer on the "Clear" patch from 2 to 1 by clicking on the yellow box in the upper right hand corner of the "Clear" patch. (Be sure to quit and re-open System Preferences after you make changes to the screen saver, or you'll keep seeing the old one when you test it.)
Everything looks perfect. The viewer looks just like you want it to but if you try out your creation as an actual screen saver it will seem like nothing has changed. It is still nine kinds of ugly (and not the nine good kinds). The last step is setting the opacity of the "Clear" patch. Yes, it seems oxymoronic but you have to set the opacity to 100% . This is also your chance to change the background color, in this example I'll leave mine as black, but if chartreuse is more your style, go crazy.
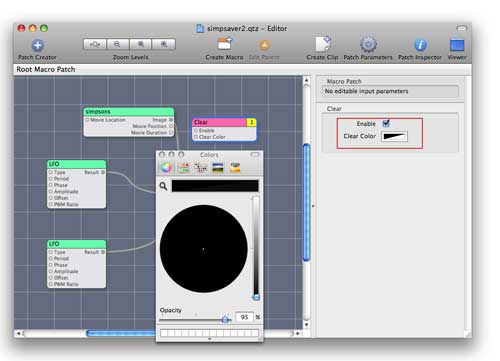
The last tweak
That's it, you're done with creating the screen saver. Give the thing a name and add the .qtz extension. Now all that is left to do is to put it somewhere that the Desktop & Screen Saver System Preferences pane can find it. A good place is in the Screen Saver folder of your user folder (/Users/username/Library/Screen Savers)
For this hack I left sound out. Usually you don't want sound with your screen saver but it turns out that if you're using Leopard, adding sound to your screen saver is trivially simple to add. And since you're going to watching video at work, you want the sound! Select the Source patch (simpsons in this Hack) with a single click. Hit the blue Patch Inspector button found in the top of the Editor window and choose Settings from the pop up menu. Choose Asynchronous Mode and the sound will play through. Sadly, this isn't available to Tiger users.
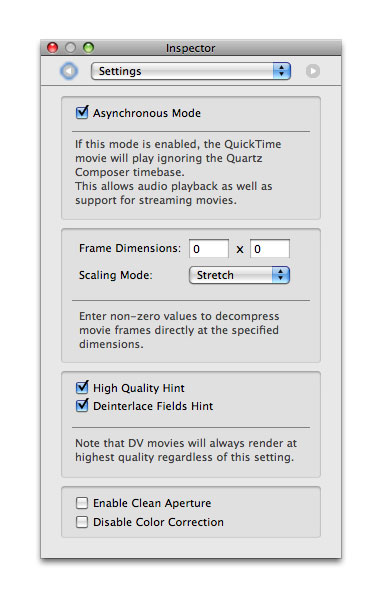
Use earphones!
Once the file is safely ensconced in the appropriate place, head to System Preferences, open the Desktop & Screen Saver panel and choose the Screen Saver option. Scroll all the way down and the screen saver you created should be there. Choose test, sit back, and enjoy your creation.
If all that is too much trouble you can download the completed .qtz file. To use the file drop it in the screen savers folder of your user library. It won't do much until you the video you desire to watch is in your Applications folder and named "random.mov".


Comments